May 18, 2013

Children + Chalkboard + Church = Christ

Let's talk church! I love being the wife of a Youth Pastor! It's so rewarding when you get to see the smiles on the children's faces :) I am now in charge of the Children's Ministry on Thursday while my husband does his study with the youth. When doing my bible study with the kids I try to use the same bible verse Jared (hubby) is using for the youth.
 This week he was using Matthew 28:16-20 THE GREAT COMMISSION. I come up with a bible study for the children (so they can understand it). I also like to add a craft to give them an even better understanding of what I'm trying to teach them and so it takes up plenty of time to keep them from getting bored. With children, talking is only allowed for so long before they are ready to bounce off the walls if you know what I mean. So I make a short bible study and that leaves plenty of time to keep them busy with a craft!
Now after having you sit through my torturous explanation...let's get started!
So the example I used to explain THE GREAT COMMISSION passage was teachers. It fit perfectly because school is almost out and who better to talk about than the hard working teachers who do so much for our kids! With that I asked them questions along the line of what is your teacher's job and so forth. I explained that teacher's don't just teach us things they show us things we are trying to learn. So when they give us an example to follow it becomes easier to learn.
This is where I brought in the lesson. I told them that Jesus asks his disciples to teach others about God. I explained that it was the duty of the disciples to teach others how they too should follow God. I explained that Jesus also wants us to be teachers to. I asked the kids what they could do to be an example and teacher of God? What can they do to set examples for other children their age? How can they bring other children their age to know Jesus like they do? Then I explained if they did these things and were followers of Christ that he would be with them forever.
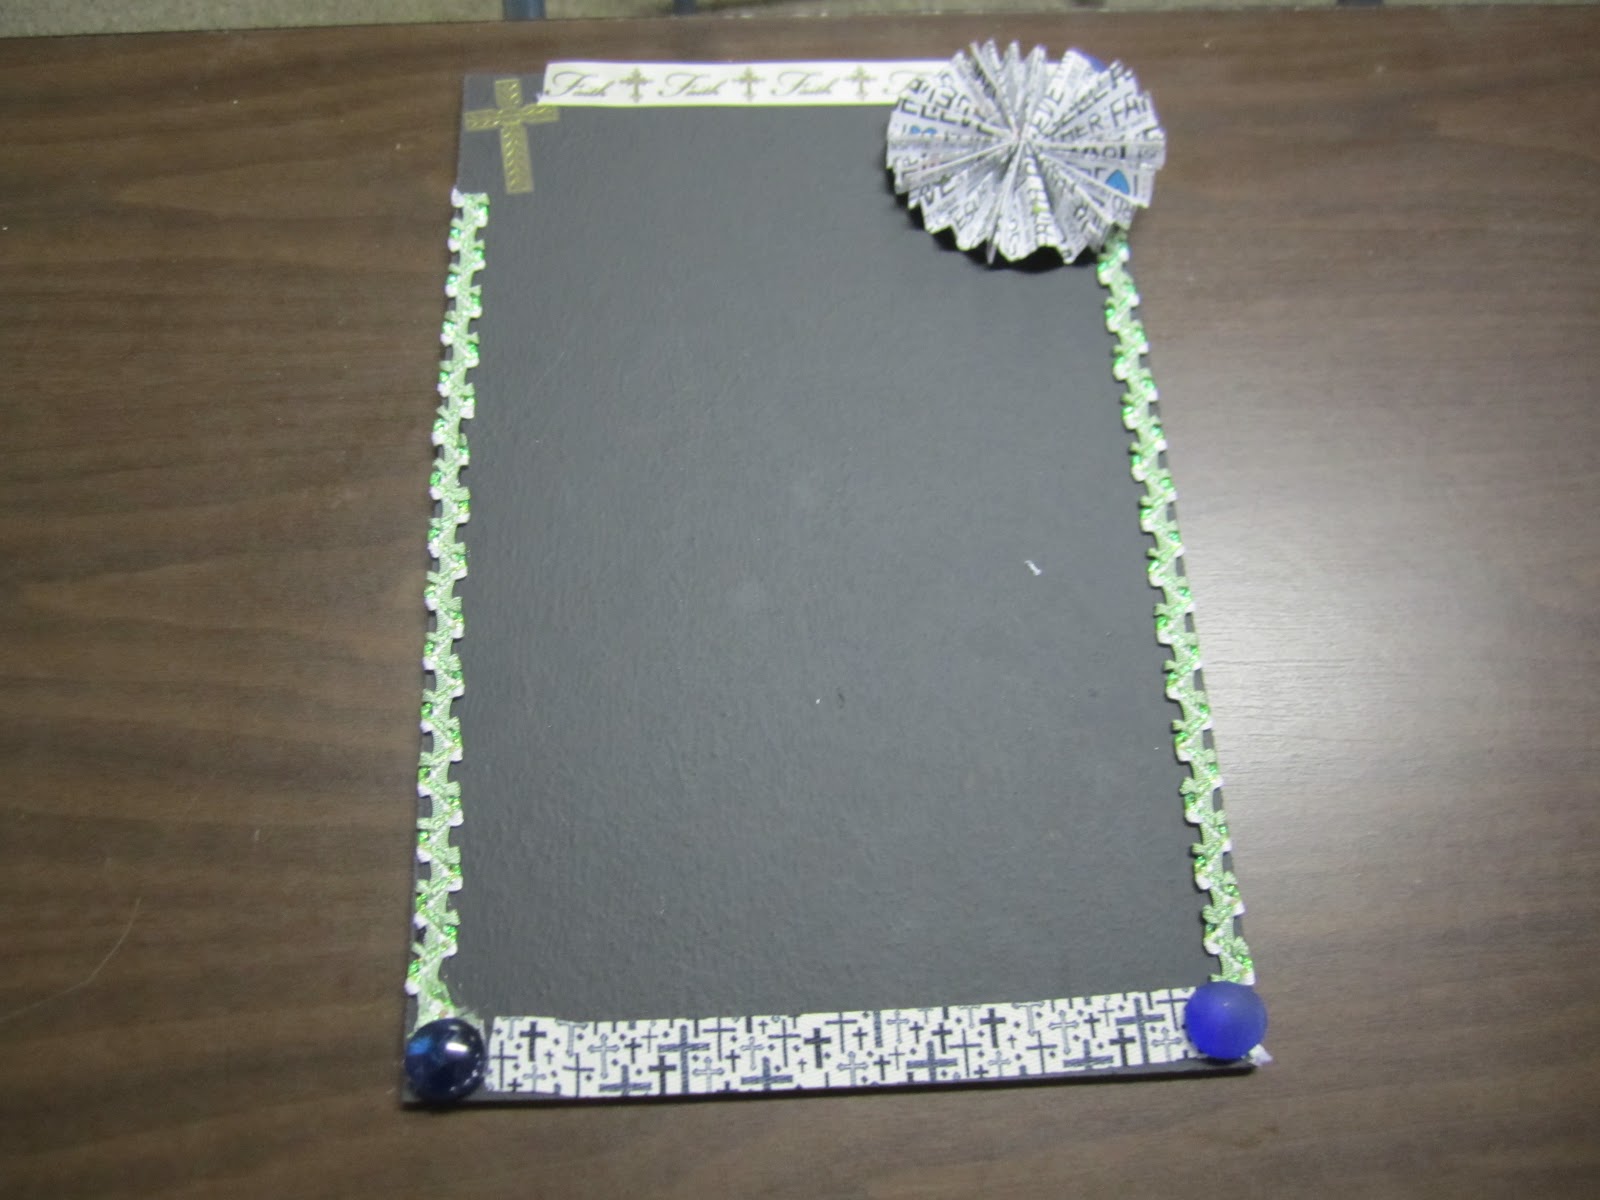
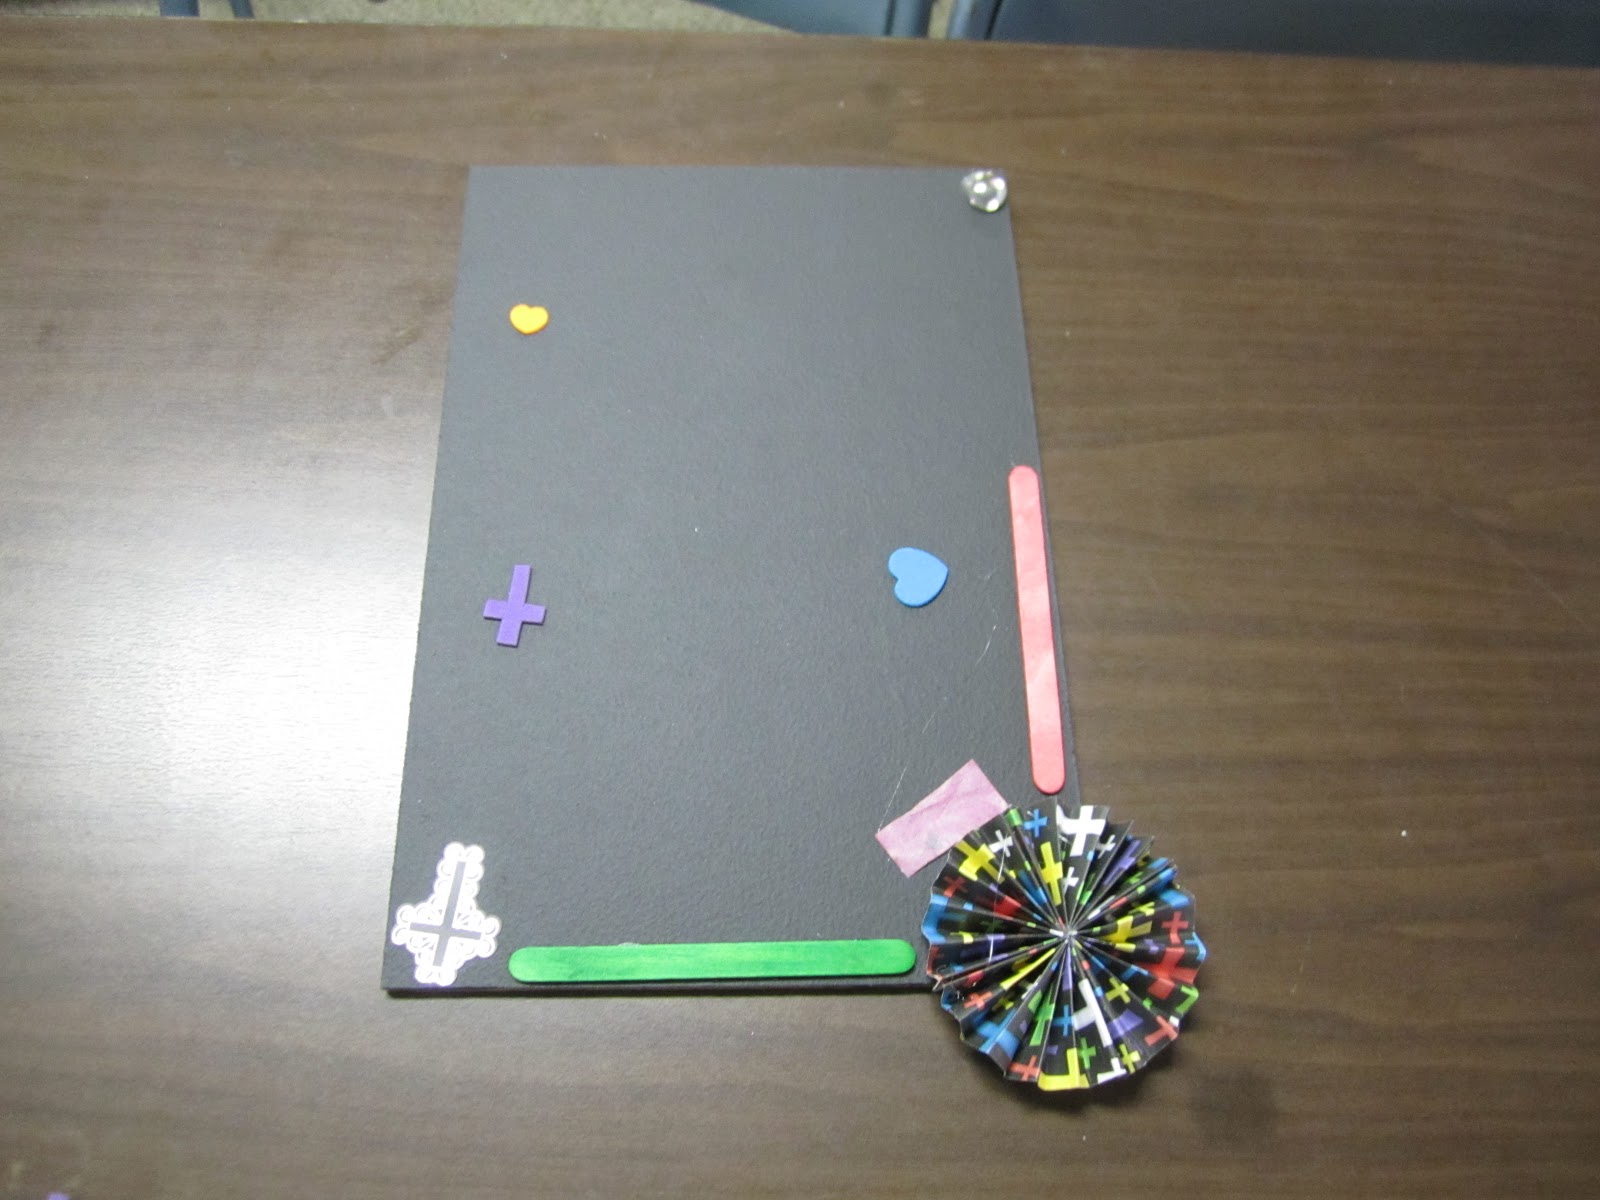
Now for the craft: I picked up some board at Home Depot. I asked them to cut it into the size I wanted. I then bought some chalkboard paint. I painted the board pieces and had the children decorate the edges. Now they have chalkboards so they can teach others to follow Jesus just like the disciples and be leaders/examples of Christ.
Here are their teaching chalkboards! The youth were even jealous and wanted to make one too!
I love this idea because you can use it for a simple bible study at home, at church, or for any idea/craft! So what do you think? I know that the children loved it! I also put the bible verse on the back so they will have it there to memorize, study, or teach.
 Then the eleven disciples went to Galilee, to the mountain where Jesus had told them to go. When they saw him, they worshiped him; but some doubted. Then Jesus came to them and said, "All authority in heaven and on earth has been given to me. Therefore go and make disciples of all nations, baptizing them in the name of the Father and of the Son and of the Holy Spirit, and teaching them to obey everything I have commanded you. And surely I am with you always, to the very end of the age."  -Matthew 28:16-20


May 13, 2013

Mother's Day Flowers

Well it's a little late to post ideas for Mother's Day but I'm going to post a couple of things I came up with for the kiddos at my church so they had something to give to their Mommy. So if you like it maybe it will come in handy for a little craft project in the future.
On Thursdays we have youth. When my hubby became the youth pastor we soon realized that the younger kids were going too. We talked and decided that he would take the youth and I would take the children so I could do a lesson that they could understand for their age (and keep them busy) and he could be more detailed with the older kids in their lesson. I also decided to that since their wasn't children's church on Sundays that I would take care of that too. When you have a 5 year old boy trying to sit through church it doesn't go so well. So our Pastor approved and I now am in charge of that also. I really am enjoying all of it. I was basically confined to my house for 12 years due to health issues, but now that that has been resolved I am happy to do anything esp. for our church! I complained for so many years that I wasn't able to use my talents like I wish I could. My advice,  just be careful what you ask God for because he heard my request, fixed my health issues, and made sure my life is super busy now. But I wouldn't change any of it. I love my new role and I love seeing the children have a big smile on their face!
So Thursday I came up with a lesson plan for children's church and soon realized that Mother's Day was the upcoming Sunday. Talk about being so busy I didn't even realize Mother's Day was approaching oops. So I looked on pinterest found this idea! Roses made from a celery stalk. I thought that was just adorable and had everything I needed already, which really helped since I had to come up with an idea last minute.

Here's the result, my 2 younger kids did.

 This one is from Cameron my 8 year old.

This one is from Zane my 5 year old.

Supplies: The bottom of a celery stalk, paint and paper
Instructions: Dip the top where you cut the celery stalk in some paint and press onto paper. Let them do some finger painting for the rose stems. I had the kids add thumb prints to make little hearts. There you have it, a simple inexpensive craft, for any occasion, for any age (even adults)!

On Sunday I had them make these flowers.

 Cameron's flower

Zane's flower


Supplies: Foam flowers, a stamp, popsicle sticks and stickers.
Place your stamp in ink and stamp it onto the flower. Hot glue the popsicle stick to the back of the flower. Hand it over to the kids and let them decorate it!

You could use any stamp for any occasion and it's super easy, keeps the kids busy, and if your kids are like mine, they love crafts!


April 19, 2013

Whipped Up Fruit

With summer fast approaching (although this Roswell, N.M. weather has been all over the place), I am so excited for the BBQs! So hopefully the wind will die down and the warm weather will stay. I have heard several old young people who said they have lived their whole lives here and have never seen this much wind in Roswell! One reason I actually enjoy Roswell is because there is not a whole lot of wind. I moved away from Clovis. N.M. for a couple of reasons but one reason happens to be the horrible winds. So enough of my chit chat.  So anyways as I was saying...who doesn't love friends and family gatherings? One of my favorite things about summer is the fruits :) Strawberries happens to be one of the favorites in the Secret household. So today I am going to share with you a family favorite to take to a BBQ!
 

So since I have no idea what to call this I'm going to call it 'whipped up fruit'. You can whip it up in minutes and it's made with whip cream (I call it whip cream but the 'right name' is whipped topping. Yum. You will need:
 
• 2 - 8 oz tubs of whip cream (whipped topping)
• 4 -6 yoplait yogurts
• 1 - 1 oz package of cheesecake pudding
• strawberries (I use about 20 of them)
• bananas (I use about 4 of them)
 

So lets get started ! Let your whip cream thaw just enough so you can stir it. Put in your yogurt and pudding. I like to let it sit for a couple of hours in the fridge but you can actually whip this up and go right out the door with it. I just like it really cold, it just seems right for hot weather. While you are letting the mixture sit in the fridge I like to put the bananas in the fridge so they are nice and cold when I put them in the mixture. After you have let it sit in the fridge for your choice of time and you are ready to walk out the door and head over to your BBQ add the strawberries and bananas!
 
Last minute note: I like to use strawberry flavored yogurt but you can use any kind. Same goes for the instant pudding...I like the cheesecake. You can also change the fruit. Say you want to use raspberry yogurt with raspberries. Or mix and match...blueberry and raspberry yogurt with fresh blueberries and raspberries. You get the idea right? Any type of yogurt with any type of fruit? Whatever hits the spot! It's good any way and the best thing about it is you can make it just about any flavor you want and change it up every time you make it! Also you can half this recipe but still use the full packet of pudding. Hope you enjoy.
 
This is a recipe you will keep forever. I love to whip this up at any given second because it's so easy and taste so good. The kids love it and I don't feel real guilty that the kids are eating way to much sweets because it has fruit in it! Welcome to my way of thinking, it has fresh fruit in it...it's good for you! Well leave me some feed back if you give it a try. I'd really like to hear if you have tried any of my blog post and your opinion. I don't have any followers yet on my blog and hope to get some soon, so if you are reading this and have been following my blog, I'd really like to have you join my blog. I promise you won't be sorry!

Click here for printable version of this recipe


April 3, 2013

My Mac~n~Cheese Must Have


Who wants to eat my homemade Macaroni and Cheese? I must say I make the best mac~n~cheese or at least everyone who taste it thinks so! Yes that is a challenge, if you think your homemade mac~n~cheese is better send me your recipe so I can taste test. Better yet you make mine and let me know what you think! Sound like a plan?


So sometime ago I needed to come up with a mac~n~cheese recipe. If you have children you know what I am talking about. Children could live off of mac~n~cheese but that nasty stuff you get in a box just don't cut it as a meal! Of course you could use Velveeta but it just don't taste like a homemade mac~n~cheese recipe. So I had to put my mind to work.
 
So the first key to making homemade mac~n~cheese is a soft cheese! Hoffman's Cheese is just that and it comes in a huge variety of flavors! I wanted a real distinct taste and the Hickory Smoked Swiss and Cheddar Cheese has a real powerful flavor that I like. I wanted it to be real cheesy so I picked up another Hoffman's flavor. I have played around over the years and I like the Pepper Jack and Hickory Smoked together. The key for me is the hickory smoked cheese, that's a must have, but you can play around with the other flavors and see what you like best. Although I think the hickory smoked is a must have the other flavors are good as well.

Now lets get to making some homemade mac~n~cheese! Boil a pot of water. When the water comes to a boil add 4 cups of elbow macaroni. I make my mac~n~cheese as a casserole so I need plenty of macaroni to fill a 9 x 13 casserole dish. While your waiting for your macaroni, grate your cheese. I use 8 oz. of each, but I'm sure you can use less if you like. When your macaroni is done cooking drain it. Bring your pot back over to the stove and add a cup of milk and your cheese. Melt your cheese and then add your macaroni back to the pot. If you are going to make this as a casserole dish make sure your mixture is creamy but yet liquidity because when you stick it in the oven you don't want it to dry out.

 
 Now when you have a husband mac~n~cheese is not good enough for a meal, so I like to add ham to it. I like to used leftover ham but we don't eat ham all the time so I like to use Farmland Fully Cooked Diced Ham as the other option.

Now mix it all up. You can eat it like this or make a little casserole with it.
 
 I then add it to a 9 x 13 casserole dish a sprinkle some Italian Style Bread Crumbs over the top of it for some added flavor and texture (see first picture above). Now stick it in the oven at 350° for about 15 minutes or so.
 
 
Take it out and I'm sure your little ones will be as happy as mine are. It's their favorite meal! And I'm sure your husband won't be disappointed either with the added meat.
 
So let me know what you think! I promise it's pretty yummy :)~  It's a great meal and it's great for a side dish also. I've brought it to many occasions and came home empty handed. Oh and if you have leftovers I like to use it for a side with hamburgers or hot dogs. There is so much you can do with this recipe it's a must have. I hope you enjoy this meal as much as my family does!


March 30, 2013

Butter Pecan Cake


So back in February I made a cake for my hubby's birthday. I got a lot of feedback from friends and family who wanted the recipe. I'm such a bad person because I never got back with them and gave them the recipe. Sorry guys, but here it is, FINALLY!
 
One of my favorite things to do is bake cakes! I'm not good at decorating them but they taste good and I guess that is all that matters, well at least for the hubby anyways! So this year for my husband's birthday I wanted to make a new cake, a cake I hadn't made before. I couldn't come up with anything. Then it hit me....an idea! When we moved to our new house we inherited all these pecan trees. My husband's new favorite snack is pecans. So that gave me the idea to make a butter pecan cake, something special just for him. How many of you love butter pecan ice cream? It was one of my Mom's favorite flavors of ice cream and that's why the idea popped into my head, memories :)
 
So anyways off to make a recipe. If you bake a lot of cakes you will began to notice that the main ingredients of cakes are all about the same. It's normally about 1 cup of butter, 2 cups of sugar, 2-4 eggs, 2 teaspoons of vanilla extract, 2 teaspoons of baking powder or soda or 1 teaspoon of each, 1/2-1 teaspoon of salt, and then milk. Milk kinda ranges but I think about 1 cup of milk or buttermilk is probably the most average amount of milk in a cake.
 
Now to come up with the recipe using those basic ingredients. Here's the recipe I came up with:
 
BUTTER PECAN CAKE
1-1/2 cup of butter at room temperature (another 1/2 cup to toast the pecans)
2 cups of sugar
1/2 cup of packed brown sugar (another 1/2 cup to toast the pecans)
4 eggs
2 teaspoons of vanilla extract
3 cups of all-purpose flour
2 teaspoons baking powder
1/2 teaspoon salt
1 cup milk
2-1/2 cups of pecans
 
The frosting was a little bit more difficult to come up with because I normally like to go with heavy cream but I decided to use evaporated milk because it's heavier in taste and gives off more of a caramelized/toasted taste and that's what I was going for with the pecans. Plus I wanted to double the size of frosting because I was making 3 layers and evaporated milk goes a lot further than heavy cream.
 
Here is the recipe I came up with for the frosting, to be honest I'm not sure I enjoyed it with this cake, I might go for more of a cream cheese frosting in the future but it was still yummy :)
 
Butter Pecan Frosting
1 cup of salted butter, at room temperature
6 cups of confectioners' sugar
1/4 cup of evaporated milk
2 teaspoons vanilla extract
 
I also made a topping with this cake and here's the topping recipe
 
Topping
1 cup of light corn syrup
1 cup of packed brown syrup
2 teaspoons of vanilla extract ( I always use more than 2 tsp. because I can never get enough vanilla but this is probably the right amount to use)
 
NOW THE DIRECTIONS!
 
*Preheat your oven to 350°
 
* Melt 1/2 cup of butter in your microwave and add 1/2 cup of brown sugar to the melted butter. Then add your pecans. Place them on a cookie sheet and bake for about 20 minutes or until they are toasted. Make sure to keep and eye on them and stir often. (If you want you can sprinkle a little bit of brown sugar over the top of them too).
 
*In a bowl combine flour, baking powder, and salt and set aside. (FLOUR MIXTURE)
 
*In a large bowl, cream together your sugars and butter, beat until fluffy and light. Add your eggs one at a time, beating after each of them and then add your vanilla. Next beat in your flour mixture to the cream mixture (about 1 cup at a time) adding a little milk with each addition. Stir in 1-1/4 cup of the toasted pecans.
 
*Pour into 3 greased and floured 9-inch round baking pans.
*Bake at 350° for about 25 minutes or until a toothpick comes out clean.
*Cool completely before removing them from your pans.
 
*For the frosting, beat the butter. Slowly add the confectioners' sugar (about 1 cup at a time) until creamed. Add your evaporated milk and vanilla and beat until smooth. ( I kinda guessed at the measurements for the frosting because I eyeballed it. So you may need to add either more evaporated milk or confectioners' sugar). Stir in remaining pecans and spread onto each layer of cake!
 
*For the topping I placed 1 cup of corn syrup, 1 cup of brown sugar, and the vanilla in a sauce pan and cooked over medium heat. Make sure to stir frequently, until sugar dissolves and comes to a slight boil. Remove from heat.
 
*I then poured it over the cake but it ruined the cake. The topping was good but it took away the taste of the cake and was really sweet. Next time I make this cake I will still make the topping but have it on the side so you can pour the amount you want onto your own slice of cake.
 
I had one happy husband and he said it was his favorite cake! I'm glad I could make him happy because he really could careless about birthday gifts... it's the cake he wants. If you have a hubby I'm sure sweets are the way to his heart too! I still think I need to make adjustments to the recipe to make it just perfect, but for now, it is still one yummy cake! Hope you enjoy it!
 

If you make this cake leave me some feedback on what you think! Sorry for such a long post but I hope the recipe is worth it! I know this recipe is a little confusing so if you have any questions let me know.

For a printable version of  this Butter Pecan Recipe click here. P.S. It is also a more understandable version of this cake :)


March 29, 2013

DIY Decorated Glass Bottles


Today I'm going to talk about a Pinterest Project and DIY Decor. Yay, two in one! As I'm decorating my living room I like to look on pinterest to get some ideas since I'm too lazy to come up with my own ideas. There are so many people out there that come up with such great ideas....and I don't happen to be one of them. Thank goodness for all those oh so talented people in this world, I don't know what I would do without you!
 
So I first got the idea from this site but I don't think that person made the bottles themselves. I think they got the idea somewhere else. So I can't direct you to that exact link because I didn't see one, but I can't be sure on that. So anyways I thought the idea would be perfect for my fireplace. I really hit a major road block when it came to decorating my fireplace. I knew I didn't want pictures on it because we take family pictures about every 2 years so I have plenty of pictures around our house. So I was defiantly leaning towards decoration especially since my house lacked decoration. So I picked up some supplies on got started on my DIY home decor.
 
Let's get started:
 
I started out with this,
Welch's sparkling juice. I had 2 of them from New Years....it's a family tradition. We kick back with the kids and have a family friendly New Years Eve party. Anyways I took off what wrapping I could and then soaked it in very hot water for about 20 minutes and was able to remove the rest. I then took a S.O.S pad and scrubbed off the sticky part.
 
Then I picked up some craft cord from Hobby Lobby.
I wrapped the cord around the bottle (in the design I wanted) and hot glued it every once in while until I got to the bottom. Make sure you pull it tight and make sure you are hot gluing on the same side of the glass bottle each time. Hot glue can get messy (at least for me). So if you are like me you want to be able to hide the imperfections. So make sure you have one side of the decorated glass bottle that you can show off, just hope that no one picks up the bottle to inspect it!
 
Now my fireplace has a little decoration!
I added some flowers for a nice touch and now I have some decor that adds a great look to my fireplace and I didn't spend much money at all!
 
This isn't where I placed the decorated glass bottles on my fireplace but because I have more DIY decor I want to share with you I didn't want to give away the final look to my fireplace. So look for more added decor in the near future.
 

March 23, 2013

Burlap Vases


For my first real blog post, I wanted to share a crafting project. So I decided on something I crafted up for my living room. Just recently we moved to a bigger house. It so happened that I was ready to get new furniture. I decided a long time ago that I would not invest in new furniture until all the kids were in school. Guess what my little one finally left the nest but I still hesitated to get new furniture because I knew that we would be moving at some point this year, for we were in desperate need for more space. Well the timing was perfect when my husband stumbled upon this house. Not only did we need more space but I wanted new furniture (a bonus). In our other house the only decor I could fit into such a small living room area were toys.

 I couldn't decide if I wanted a modern look or something else. I decided that the modern look wasn't for me. I feel having the modern look don't really allow you to add your own personal touches. I decided to go with a more country feel since I had grown up in the country.
 
 Now that I babbled on I will share with you the vases I made for my living room. I will try to explain as much as I can. I didn't plan on having a blog so I didn't note it step by step. So I will explain as best as I can.
 

 I bought these cheap vases at one of the dollars stores (I'm not sure which one). They were cheap and looked cheap and really needed some personal touches. Plus they didn't have the color scheme I wanted.

 
Now this is where explaining a step by step process is going to be a little difficult because I can't show you step by step instructions or show you the materials I used. But I will try to the best of my knowledge, so bare with me.
 
The wrap around is called burlap wired edge ribbon that I found at Hobby Lobby. It doesn't come cheap but it was reasonable when I got it for 50% off. I found it in a tan and brown, just the color scheme I was going for (it matched my furniture).
 
Now that I had found what I was going to cover the vase with I needed some trim. I didn't have a plan on what I was going to use until I stumbled across this trim in the fabric section of Hobby Lobby. I  also picked it up for 50% off (as you can see in the picture there are 2 different trims). It had the other colors I was going for, a light blue color, a darker green color, and a red color. I knew it would be perfect!
 
So I got home turned on my hot glue gun and started wrapping with the burlap. I then wrapped the top and bottom of the vase with the decor cord. Some little flowers in the front of the vase for some added touches and a floral arrangement to fill it.


I now have my own unique vases that add a nice touch to what used to be an empty decorated fireplace. I know the pictures are horrible but what do you think, does it add the right flavor to a fire place?

Welcome to Successful Secrets!

Welcome to Successful Secrets. On here I'm going to share with you my everyday secrets to living. I guess I can't really call them secrets because it's pretty much everyday life. Cooking, cleaning, being a wife and mother, hobbies and so forth. I'm also hoping to hear about things from different perspectives too. It's always nice to learn new things especially now days. I don't know about you but for me, any advice that could make everyday living a little easier is a big plus in my book! And that is why I decided to share my Successful Secrets with you. I can't wait to get started!
09 10